

Navigating npm Update Woes: A Guide to Resolve Compatibility Issues
Navigating Compatibility Challenges: A Step-by-Step Guide


Photo by Lautaro Andreani on Unsplash
Introduction:
In the middle of working on a freelance gig, I faced an unexpected hurdle. While trying to update my project, a seemingly simple task, I encountered a bunch of confusing warnings – a sign that something wasn't quite right. Let me share the story of how I went from a routine npm update to a journey of compatibility puzzles.
Journey:
In the midst of coding for a freelance project, where each piece of code felt like a step towards something great, I took a break. When I returned, it was time to update my project's bits and pieces. Visual Studio Code? Check. Next up: npm.
The Unexpected Warning: WARN EBADENGINE:
As I hit the update button with npm update -g, I got more than I bargained for. "WARN EBADENGINE" popped up on the screen, basically saying my Node.js version and some sneaky packages weren't getting along.

The warnings didn't stop at compatibility. There were whispers of deprecation – hints that some parts of my project were getting old and needed an update. The journey into the world of @babel, source-map, and a bunch of others began.
Simple Solutions:
To figure out this compatibility puzzle, I explored Node.js version managers – NVM or NVS. These tools made it easier to switch between different Node.js versions. With the help of npm-check-updates, a tool that pointed out outdated bits in my project, I updated things one step at a time.
Step 1: Check Node.js Version
Begin by verifying your current Node.js version using the command node -v. Ensure it aligns with the requirements mentioned in the error message.
Step 2: Consider Node Version Manager (NVM)
Install Node Version Manager (NVM) for easy Node.js version management:
bashCopy codecurl -o- https://raw.githubusercontent.com/nvm-sh/nvm/v0.39.1/install.sh | bash
Restart your terminal or run source ~/.bashrc to apply changes. Install the required Node.js version:
bashCopy codenvm install 18
Step 3: Update npm
Ensure npm is up-to-date with the latest version:
bashCopy codenpm install -g npm@latest
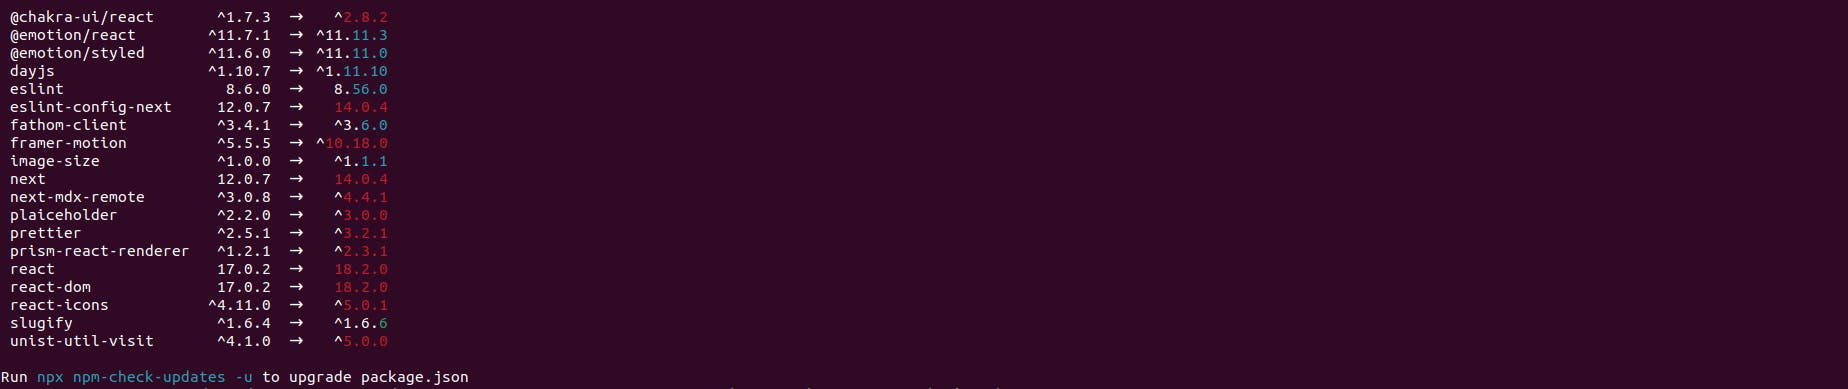
Step 4: Identify Outdated Packages
Run npx npm-check-updates to identify outdated packages in your project:
bashCopy codenpx npm-check-updates
Step 5: Update Packages
Update your project's packages to their latest versions:
bashCopy codenpx npm-check-updates -u
npm install
Step 6: Retry npm Update
Attempt the npm update again:
bashCopy codenpm update -g
Step 7: Test Your Project
Thoroughly test your Laravel project to ensure all functionalities are working as expected. Pay attention to any new warnings or errors that may arise.

The Lesson Learned:
Compatibility, a Big word, is a big deal in my coding world. Think of each project like a digital storybook. Just like you need to flip the pages to keep the story going, projects need updates to keep them working well. The errors I faced weren't stop signs; they were more like arrows showing me the way to a better, more modern project.